[스프링 시큐리티]_01_spring-boot-starter-security
스프링 시큐리티 1부: spring-boot-starter-security
스프링 시큐리티
- 웹 시큐리티
- 메소드 시큐리티
- 다양한 인증 방법 지원
- LDAP, 폼 인증, Basic 인증, OAuth, …
스프링 부트 시큐리티 자동 설정
- spring-boot-starter-security 의존성을 추가하면 다음 두가지 자동설정이 적용된다.
- 스프링 시큐리티 5.* 의존성 추가
- SecurityAutoConfiguration → 사실상 스프링 시큐리티가 제공해주는 기능을 그대로 사용
- UserDetailsServiceAutoConfiguration → 보통(100%) UserDetailsService를 만들어서 사용하므로 자동설정 사용할 일이 없음
- 모든 요청에 인증이 필요함.
- 기본 사용자 생성
- Username: user
- Password: 애플리케이션을 실행할 때 마다 랜덤 값 생성 (콘솔에 출력 됨.)
- spring.security.user.name
- spring.security.user.password
- 인증 관련 각종 이벤트 발생
- DefaultAuthenticationEventPublisher 빈 등록
- 다양한 인증 에러 핸들러 등록 가능
스프링 부트 시큐리티 테스트
- https://docs.spring.io/spring-security/site/docs/current/reference/html/test-method.html
스프링부트 프로젝트에 spring-boot-starter-security 의존성만 추가하면 스프링 시큐리티를 사용할 수 있다.
※ 프로젝트 : springbootsecurity - 의존성:web
(실습 준비)
/hello,/my에 대한 요청을 처리하는 컨트롤러 추가- index.html, hello.html, my.html 페이지 추가
-
컨트롤러 테스트 추가
- Thymleaf로 뷰 렌더링
실습
- 테스트 코드 작성 ⇒ 테스트 성공
@Test
public void hello() throws Exception {
    mockMvc.perform(get("/hello")
                .accept(MediaType.TEXT_HTML))
            .andDo(print())
            .andExpect(status().isOk())
            .andExpect(view().name("hello"));
}

@Test
public void my() throws Exception {
    mockMvc.perform(get("/my"))
            .andDo(print())
            .andExpect(status().isOk())
            .andExpect(view().name("my"));
}
- 스프링 시큐리티 의존성 추가
<dependency>
    <groupId>org.springframework.boot</groupId>
    <artifactId>spring-boot-starter-security</artifactId>
</dependency>
- 다시 테스트 코드 실행 ⇒ 시큐리티를 추가하면 테스트가 깨진다.
-
“/my” ⇒ 401 Unauthorized 응답 : “Basic 인증”
MockHttpServletResponse:
           Status = 401
    Error message = Unauthorized
          Headers = [WWW-Authenticate:"Basic realm="Realm"", X-Content-Type-Options:"nosniff", X-XSS-Protection:"1; mode=block", Cache-Control:"no-cache, no-store, max-age=0, must-revalidate", Pragma:"no-cache", Expires:"0", X-Frame-Options:"DENY"]
Accect 헤더에 별도로 값을 지정하지 않았기 때문에 서버는 클라이언트에게 Basic인증을 요청하게 된다.
-
“/hello” ⇒ 302 Redirect 응답 : “폼 인증”
MockHttpServletResponse:
           Status = 302
    Error message = null
          Headers = [X-Content-Type-Options:"nosniff", X-XSS-Protection:"1; mode=block", Cache-Control:"no-cache, no-store, max-age=0, must-revalidate", Pragma:"no-cache", Expires:"0", X-Frame-Options:"DENY", Location:"http://localhost/login"]
     Content type = null
             Body =
    Forwarded URL = null
   Redirected URL = http://localhost/login
          Cookies = []
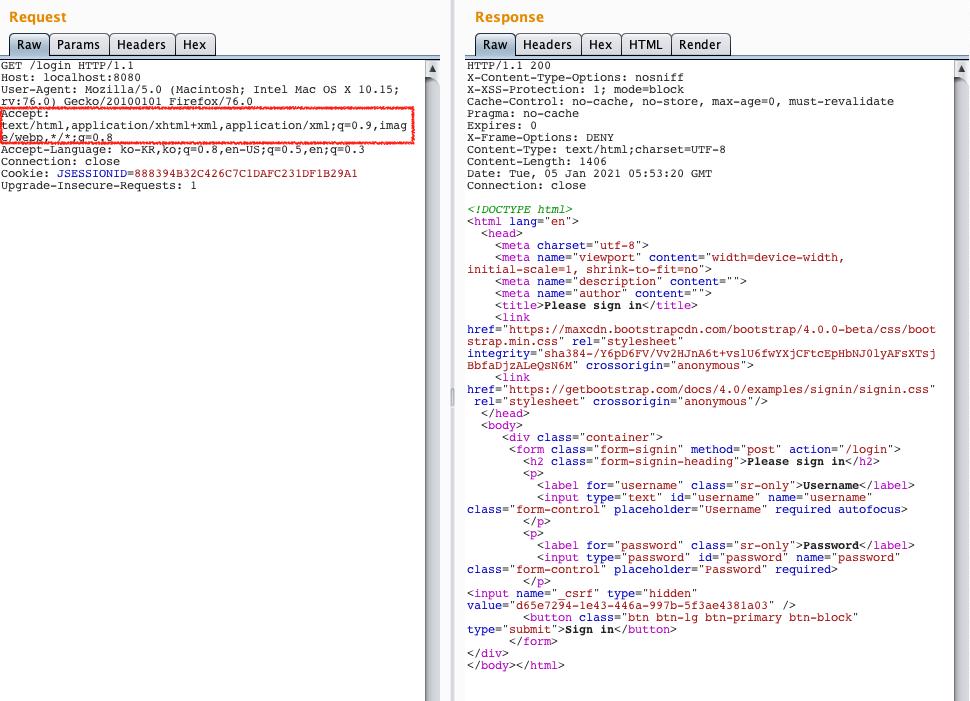
Accept 헤더에 “text/html”을 담았기 때문에 서버는 폼인증을 받기위한 (스프링부트가 기본으로 만들어주는 )로그인 페이지로 리다이렉트 한다.
why??
스프링부트가 제공하는 시큐리티 자동설정 중 하나이다.
-
모든 요청이 스프링 시큐리티로 인해
인증이 필요하게 된다. -
Basic Authentication과 Form 인증이 둘 다 적용된다.
Basic Authentication는 Accept 헤더에 따라 달라진다. (* Accept 헤더 : 요청이 원하는 응답의 형태)
우리는 따로 Accept 헤더에 text/html을 담아서 보내지 않았기 때문에, Basic 인증을 응답으로 보낸다.
브라우저가 Basic Authentication 응답을 받으면 브러우저의 내장된 Basic Authentication Form을 띄우게 된다.
보통 브라우저에서 요청하는 HTTP Accept 헤더에는 text/html이 들어간다. 그런 경우 폼 인증으로 넘어간다.
(⇒ 폼인증 vs Basic 인증 vs 다이제스트 인증 의 차이점과 보안 취약점을 확인해보자)
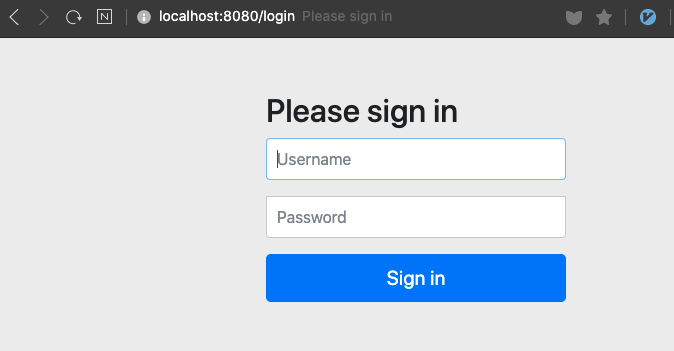
- 웹브라우저에서 루트(/)에 접근하면 자동으로 로그인 페이지로 넘어간다.

폼 로그인 관련 설정이 자동으로 적용돼서 루트(/)를 요청했지만 인증정보가 없기 때문에 스프링 시큐리티에서 자동으로 만들어준 로그인 폼 페이지가 띄워진다.
폼에 입력할 수 있는 정보를 스프링 시큐리티가 자동으로 만들어준다. (스프링부트가 제공하는 자동설정에 의해서 만들어진 정보)
- Username : user
- Password : 애플리케이션을 실행할 때 마다 랜덤 값 생성 (콘솔에 출력 됨.)

위 정보로 로그인 후 모든 페이지에 접근 가능하다.
스프링 부트 시큐리티 자동 설정
SecurityAutoConfiguration
스프링 시큐리티가 의존성 추가되면 자동으로 설정되는 파일
DefaultAuthenticationEventPublisher 가 등록되어 있다.
⇒ 스프링 시큐리티 기능이므로 스프링 부트를 쓰지 않더라도 이 빈을 등록하면 사용할 수 있다.
DefaultAuthenticationEventPublisher 는 SpringBootWebSecurityConfiguration 을 import해서 사용되고, SpringBootWebSecurityConfiguration 는 WebSecurityConfigurerAdapter를 상속받아 만든다.
-
인증 관련 각종 이벤트 발생
-
DefaultAuthenticationEventPublisher 빈 등록
-
다양한 인증 에러 핸들러 등록 가능
“비번이 틀렸다”, “User가 틀렸다”, “account가 expired되었다.” 여러 경우에 대해서 이벤트를 발생시키고, 우리는 그 이벤트 핸들러를 등록해서 유저의 상태를 변경하는 등 여러가지 일을 할 수 있다.
-
-
WebSecurityConfigurerAdapter
스프링 시큐리티 자바 기반의 설정을 만들 때 사용할 기본 클래스이다. 이 클래스를 보통 상속받아 만들게 되어있다.
@Configuration(proxyBeanMethods = false) @ConditionalOnDefaultWebSecurity @ConditionalOnWebApplication(type = Type.SERVLET) class SpringBootWebSecurityConfiguration { @Bean @Order(SecurityProperties.BASIC_AUTH_ORDER) SecurityFilterChain defaultSecurityFilterChain(HttpSecurity http) throws Exception { http.authorizeRequests().anyRequest().authenticated().and().formLogin().and().httpBasic(); return http.build(); } }-
getHttp(): 이 메서드에 정의된 설정들이 적용된다. -
configure()스프링 시큐리티가 제공해주는 설정으로 (스프링부트가 별도의 설정이 없다면) 이 설정을 그대로 적용한다.
protected void configure(HttpSecurity http) throws Exception {
   this.logger.debug("Using default configure(HttpSecurity). "
         + "If subclassed this will potentially override subclass configure(HttpSecurity).");
   http.authorizeRequests((requests) -> requests.anyRequest().authenticated()); //모든 요청을 가로채서 인증을 받도록 한다.
   http.formLogin(); //form 로그인 사용
   http.httpBasic(); //basic 인증도 사용
}
-
※ SecurityAutoConfiguration 자동설정을 쓰지않고 다음과 같이 직접 빈을 등록해서 거의 동일한 기능을 사용할 수 있는 우리만의 웹 시큐리티 설정을 사용할 수 있다.
(이렇게 직접 등록할 경우 스프링부트가 제공하는 SecurityAutoConfiguration은 사용되지 않는다.)
import org.springframework.context.annotation.Configuration;
import org.springframework.security.config.annotation.web.configuration.WebSecurityConfigurerAdapter;

@Configuration
public class WebSecurityConfig extends WebSecurityConfigurerAdapter {
}
UserDetailsServiceAutoConfiguration
-
스프링 부트가 제공해주는 기능
-
스프링부트 애플리케이션이 구동될 때, 아래 클래스가 없다면,
inMemoryUserDetailsManager를 만들어서 랜덤한 유저 객체 하나를 생성해서 만들어준다.@ConditionalOnMissingBean( value = { AuthenticationManager.class, AuthenticationProvider.class, UserDetailsService.class },inMemoryUserDetailsManager를 사용하고 싶지 않다면UserDetailsService를 만들어서 사용하면 된다. -
보통 (100%) 스프링 시큐리티를 적용하는 프로젝트들은 프로젝트만의
UserDetailsService를 등록하게 되어있다.
⇒ 스프링부트가 제공하는 스프링 시큐리티에 관련된 기능들은 사실상 거의 사용될 일이 없다.
깨진 테스트 수정
-
의존성 추가
<dependency> <groupId>org.springframework.security</groupId> <artifactId>spring-security-test</artifactId> <!-- <version>${spring-security.version}</version>--> <!--최신 스프링은 버전지원을 해줌 --> <scope>test</scope> </dependency> -
테스트 마다
@WithMockUser애노테이션을 추가 (또는 클래스에 추가)가짜 유저 인증 정보를 추가해서 테스트를 추가해준다.
@Test
@WithMockUser
public void hello() throws Exception {
    mockMvc.perform(get("/hello")
                .accept(MediaType.TEXT_HTML))
            .andDo(print())
            .andExpect(status().isOk())
            .andExpect(view().name("hello"));
}

@Test
@DisplayName("인증정보가 없는 유저의 경우 Unauthorized응답")
public void hello_without_user() throws Exception {
    mockMvc.perform(get("/hello"))
            .andDo(print())
            .andExpect(status().isUnauthorized());
}
- 스프링 부트 시큐리티 테스트가 제공하는 다양한 기능
- 특정 유저 정보로 로그인 테스트를 할 수 있다.
- https://docs.spring.io/spring-security/site/docs/current/reference/html/test-method.html
Basic 인증 vs 폼 인증
※ Basic 인증


※ 폼 인증


※ Basic 인증 보안 주의
