[웹MVC]_11_CORS
스프링 웹 MVC 11부: CORS
SOP과 CORS
-
Single-Origin Policy
- Cross-Origin Resource Sharing
- Origin?
- URI 스키마 (http, https)
- hostname (whiteship.me, localhost)
- 포트 (8080, 18080)
- 스프링 MVC @CrossOrigin
- https://docs.spring.io/spring/docs/5.0.7.RELEASE/spring-framework-reference/web.html#mvc-cors
- @Controller나 @RequestMapping에 추가하거나
- WebMvcConfigurer 사용해서 글로벌 설정
CORS (Cross-Origin Resource Sharing)
-
Single-Origin Policy 를 우회하기 위한 표준 기술 (웹브라우저 지원 기술)
- Single-Origin Policy : 같은 Origin에만 요청을 보낼 수 있다.
-
CORS : 서로 다른 Origin 끼리 리소스를 공유할 수 있는 표준 기술
- 기본적으로 SOP가 적용되어 있다.
Origin ?
-
URL 스키마, hostname, 포트 3가지를 조합한 것이 Origin이다.
-
이 하나의 Origin이 또 다른 Origin을 호출할 수 없다.
-
RestAPI를 제공하는 서버가
http://localhost:8080에서 제공되고 있고, 그 RestAPI를http://localhost:18080을 사용하는 애플리케이션에서 호출한다 ? 호출하지 못한다.18080웹 브라우저에서8080에 띄워져있는 서버의 리소스를 가져오려고하면 SOP에 위반이되기 때문에 호출할 수 없다. -
SOP를 우회하는 표준 기술이 생겼고 Spring MVC가 이 기능을 지원한다.
-
SpringBoot가 해주는 일
-
Spring MVC에서 CORS를 사용하려면 여러가지 빈 설정을 해줘야하는데, 이러한 빈 설정들을 자동으로 해준다.
별도의 빈 설정없이
@CrossOrigin애노테이션을 사용해서 SpringMVC가 지원하는 CORS기능을 사용할 수 있다.
-
(실습)
-
RestAPI를 제공하는 서버 :
springcorsserver: Spring Initializr, java 8, (dependency) Spring Web -
RestAPI를 요청하는 클라이언트 :
springcorssclient: Spring Initializr, java 8, (dependency) Spring Web-
18080포트에 애플리케이션 띄우는 설정 -
application.propertiesserver.port=18080 -
JQuery를 추가해서 ajax로 API 호출
<dependency>
  <groupId>org.webjars.bower</groupId>
  <artifactId>jquery</artifactId>
  <version>3.5.1</version>
</dependency>
<!DOCTYPE html> <html lang="en"> <head> <meta charset="UTF-8"> <title>Title</title> </head> <body> <h1>CORS Client</h1> <script src="/webjars/jquery/3.5.1/dist/jquery.min.js"></script> <script> $(function() { $.ajax("http://localhost:8080/hello") .done(function (msg) { alert(msg) }) .fail(function () { alert("fail"); }) }) </script> </body> </html>
-
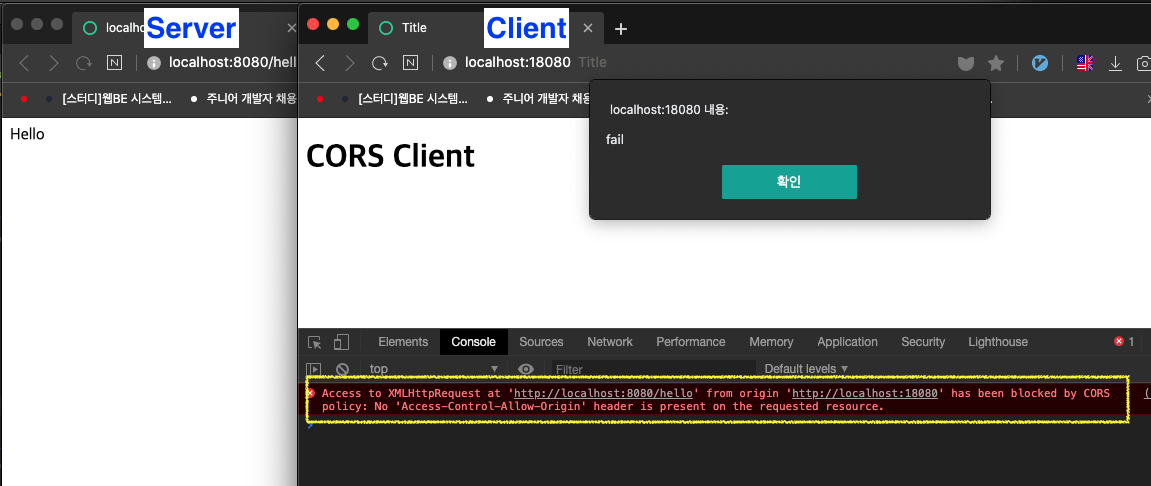
SOP 정책으로 요청 Fail

Access to XMLHttpRequest at 'http://localhost:8080/hello' from origin 'http://localhost:18080' has been blocked by CORS policy: No 'Access-Control-Allow-Origin' header is present on the requested resource.
서버로 부터 Access-Control-Allow-Origin 헤더가 오고있지 않다. 이 Origin(http://localhost:18080)은 http://localhost:8080/hello에 접속할 수 없다.
⇒ 서버가 Access-Control-Allow-Origin 헤더를 보내줘야 한다.
-
Access-Control-Allow-Origin : 어떤 Origin이 나(서버)에게 접근할 수 있는지 알려주는 헤더이다.
이 헤더에 있는 정보와 자신의 정보가 매치되면 실제 요청을 보내는 것이다.
서버에서 CORS를 지원하는 코드 추가
-
서버의 리소스를 가져갈 수 있는 Origin들을 설정
-
@CrossOrigin(origins = "http://localhost:18080")
@SpringBootApplication
@RestController
public class SpringcorsserverApplication {

    @CrossOrigin(origins = "http://localhost:18080")
    @GetMapping("/hello")
    public String hello() {
        return "Hello";
    }

    public static void main(String[] args) {
        SpringApplication.run(SpringcorsserverApplication.class, args);
    }

}
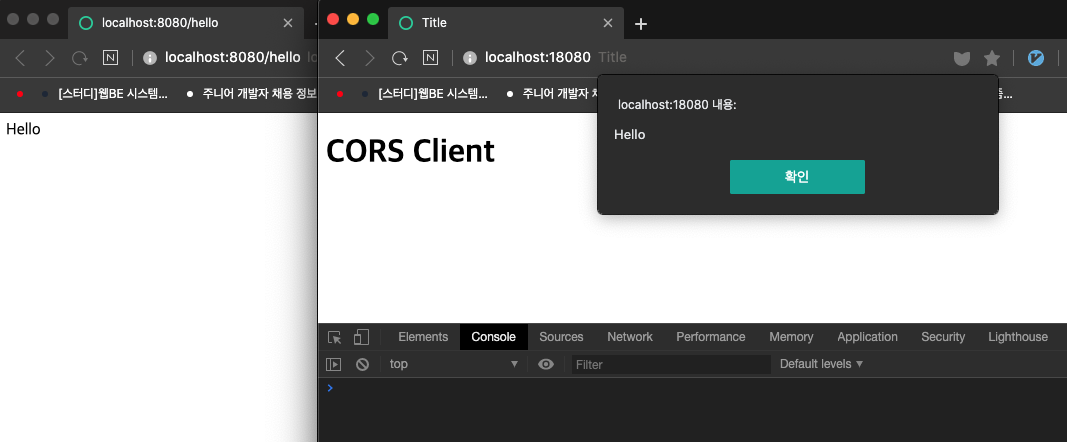
⇒ 리소스 요청 성공

웹 설정 파일로 CORS 지원 설정 추가
설정을 모든 메서드마다 할 수 없음. 허용할 컨트롤러에 붙이거나, 여러 컨트롤러에 걸쳐 설정해야 한다면 WebConfig 설정 파일을 만들어서 설정할 수 있다.
모든 컨틀롤러에 글로벌한 적용이 가능
-
WebMvcConfigurer 인터페이스를 확장해서 만들기
SpringBoot가 제공하는 Spring MVC기능을 전부 사용하면서 추가로 기능을 확장할 수 있다.
-
CorsRegistry에 허용할 Origin을 등록해주면 된다.
@Configuration
public class WebConfig implements WebMvcConfigurer {

    @Override
    public void addCorsMappings(CorsRegistry registry) {
        registry.addMapping("/**") //허용할 리소스
                .allowedOrigins("http://localhost:18080"); //허용할 Origin
    }
}
