[활용]_03_외부설정
외부 설정 1부
사용할 수 있는 외부 설정
- properties
- YAML
- 환경변수
- 커맨드 라인 아규먼트
프로퍼티 우선 순위
-
유저 홈 디렉토리에 있는 spring-boot-dev-tools.properties
-
테스트에 있는 @TestPropertySource
-
@SpringBootTest 애노테이션의 properties 애트리뷰트
-
커맨드 라인 아규먼트
-
SPRING_APPLICATION_JSON (환경 변수 또는 시스템 프로티) 에 들어있는
프로퍼티
-
ServletConfig 파라미터
-
ServletContext 파라미터
-
java:comp/env JNDI 애트리뷰트
-
System.getProperties() 자바 시스템 프로퍼티
-
OS 환경 변수
-
RandomValuePropertySource
-
JAR 밖에 있는 특정 프로파일용 application properties
-
JAR 안에 있는 특정 프로파일용 application properties
-
JAR 밖에 있는 application properties
-
JAR 안에 있는 application properties
-
@PropertySource
-
기본 프로퍼티 (SpringApplication.setDefaultProperties)
application.properties 우선 순위
- file:./config/
- file:./
./: Project 루트 - JAR 파일이 실행되는 위치)
-
classpath:/config/
- classpath:/
- (높은게 낮은걸 덮어 쓴다.)
랜덤값 설정하기
● ${random.*}
플레이스 홀더
- name = keesun
- fullName = ${name} baik
-
- 외부설정
-
어플리케이션에서 사용하는 여러가지 설정값들을 어플리케이션 내/외부에 정의할 수 있는 기능
- application.properties
- 가장 중요한 설정 파일
- 스프링부트가 어플리케이션을 구동할 때 자동으로 로딩하는 파일 이름 규약(컨벤션)이다.
key = value 형태로 값을 정의하면 어플리케이션에서 참조해서 사용할 수 있다.
#application.properties
person.name = solar
@Value("{key값}") 으로 값을 가져와 사용할 수 있다.
@Component
public class SampleRunner implements ApplicationRunner {

    @Value("${person.name}")
    private String name;

    @Override
    public void run(ApplicationArguments args) throws Exception {
        System.out.println("=============================");
        System.out.println(name);
        System.out.println("=============================");
    }
}
2020-09-05 14:31:14.863  INFO 52625 --- [           main] d.s.springinit.SpringinitApplication     : Started SpringinitApplication in 1.752 seconds (JVM running for 2.276)
=============================
solar
=============================
랜덤값 설정하기
-
${random.*}
person.age = ${random.int} -
서버 랜덤 포트를
random변수로 정하지 말 것. (가용한 범위를 고려하지 않음)0번으로 주면 가용한 port 범위 내에서 찾아서 랜덤으로 포트를 지정해준다.
server.port = 0
플레이스 홀더
- 앞서 정의한 설정값을 다시 사용할 수 있다.
person.name = solar
person.fullName = ${person.name} Kim
프로퍼티 우선 순위
- 프로퍼티 값이 여러곳에서 중복되어있다면 높은 우선순위를 가진 설정으로 오버라이딩 된다.
Command Line Argument
다음 두 설정이 되어있는 상태에서 실습
-
4위 - 커맨드 라인 아규먼트
-
15위 - JAR 안에 있는 application properties
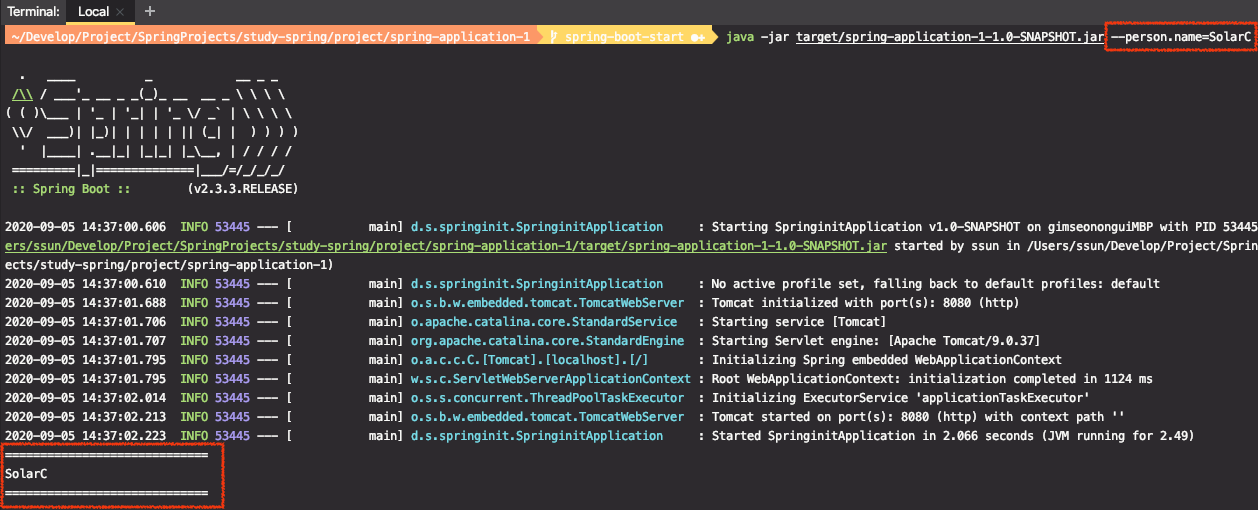
jar 를 실행하면서 아규먼트를 넘겨준다.
mvn clean packages -DskipTests
java -jar arget/spring-application-1-1.0-SNAPSHOT.jar --person.name=SolarC
커맨드 라인의 아규먼트 값으로 출력된다.

테스트용 properties 파일
1. 환경변수를 체크하는 테스트코드를 작성해보자
모든 프로퍼티들은 기본적으로 Environment를 통해서 확인할 수 있다.
※ 주의 : import org.springframework.core.env.Environment
springframework의 Environment를 import 해야함
import org.junit.Test;
import org.junit.runner.RunWith;
import org.springframework.beans.factory.annotation.Autowired;
import org.springframework.boot.test.context.SpringBootTest;
import org.springframework.core.env.Environment;
import org.springframework.test.context.junit4.SpringRunner;

import static org.assertj.core.api.Assertions.assertThat;

@RunWith(SpringRunner.class)
@SpringBootTest
public class SpringinitApplicationTest {

    @Autowired
    Environment environment;

    @Test
    public void contextLoads() {
        assertThat(environment.getProperty("person.name"))
                .isEqualTo("solar");
    }
}

※ 테스트 코드 작성을 위해 의존성 추가
- Junit4, AsserJ 사용
<dependency>
  <groupId>org.springframework</groupId>
  <artifactId>spring-test</artifactId>
  <version>5.2.8.RELEASE</version>
  <scope>test</scope>
</dependency>
<!-- https://mvnrepository.com/artifact/org.assertj/assertj-core -->
<dependency>
  <groupId>org.assertj</groupId>
  <artifactId>assertj-core</artifactId>
  <version>3.15.0</version>
  <scope>test</scope>
</dependency>
<dependency>
  <groupId>junit</groupId>
  <artifactId>junit</artifactId>
  <version>4.13</version>
  <scope>test</scope>
</dependency>
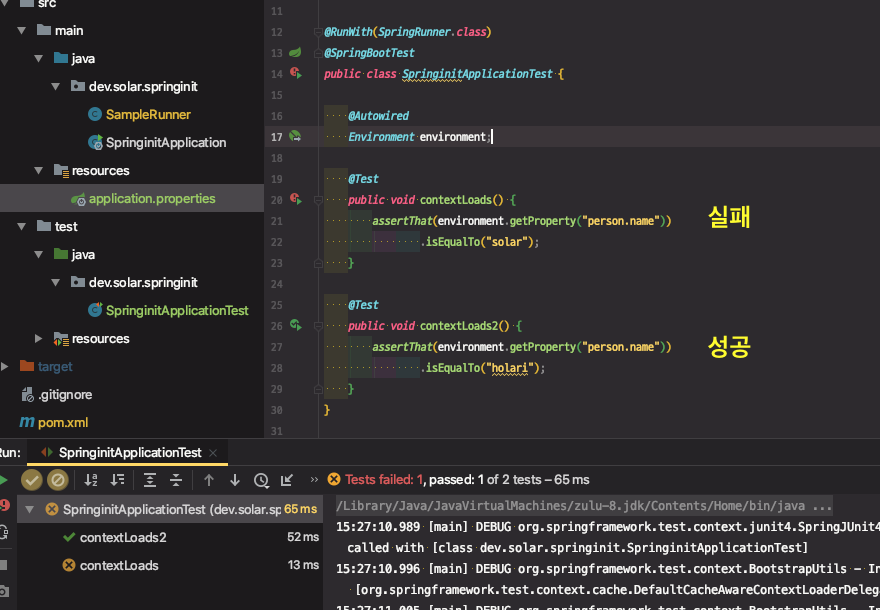
2. 테스트를 위해서 테스트용 properties를 정의
[test] > [resources] > application.properties 파일 생성
person.name = holari
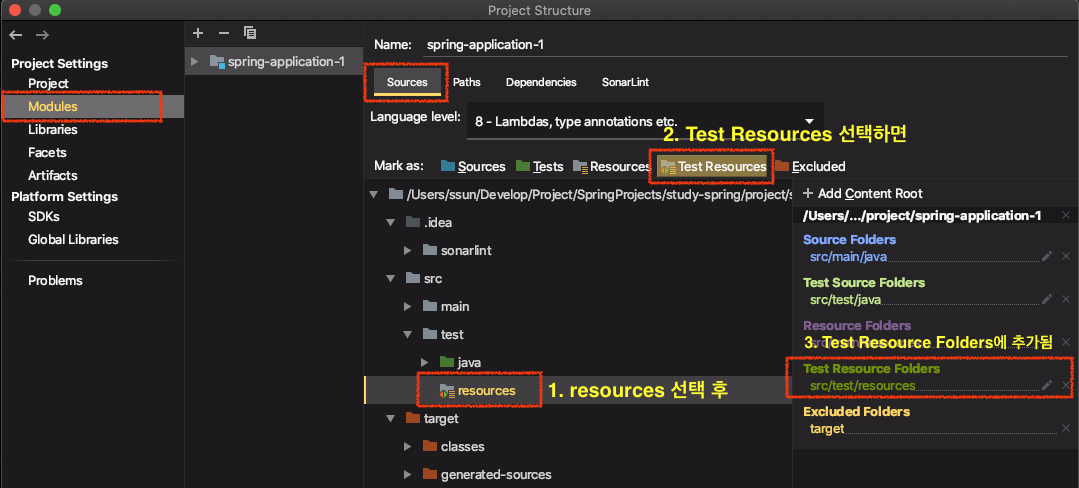
테스트용 properties 파일을 모듈에 등록
[Project Structure] (cmd + i) > [Modules] > [프로젝트] > [Source] > [test > resources] 디렉토리 선택 후, > [Test Resources] 탭 클릭 ⇒ 모듈에 추가 됨

그래야 해당 파일에 스프링 아이콘이 생기면서 자동완성이 제공된다.
테스트용 resource를 읽어오는 것 확인

※ 테스트 코드 빌드를 할 때 진행 순서
먼저 src 하위의 파일을 빌드하는 시점에 main 하위의 모든 파일(application.properties 포함)이 ClassPath에 들어간다.
그 후, 테스트코드 파일을 컴파일해서 test 하위의 모든 파일이(application.properties 포함) ClassPath에 들어간다.
그 때, application.properties 파일이 test 디렉토리에 있던 application.properties 파일로 바뀌는 것이다. 그래서 테스트로 돌리면 test용 application.properties 파일이 읽혀서 이 값으로 찍히게 되는 것이다.
※ 테스트용 properties 파일을 만들 경우 주의해야할 버그 포인트
src > main > resources > application.properties 에 속성을 하나 추가해보자
person.name = solar
person.age = ${random.int}
@Component
public class SampleRunner implements ApplicationRunner {

    @Value("${person.name}")
    private String name;

    @Value("${person.age}")
    private int age;

    @Override
    public void run(ApplicationArguments args) throws Exception {
        System.out.println("=============================");
        System.out.println(name);
        System.out.println(age);
        System.out.println("=============================");
    }
}
그리고 프로그램을 실행하면
=============================
solar
571999630
=============================
⇒ 오류 없이 잘 실행된다.
하지만 이렇게 추가한 뒤, 테스트를 다시 돌리면 ???
person.age 를 찾을 수 없다는 에러가 난다. 테스트로 실행시키면 빌드할 때 테스트용 application.properties 파일로 덮어씌워지기 때문에 해당 파일에는 ${person.age} 라는 설정을 추가하지 않아서 찾을 수 없다는 에러가 나는 것이다.

⇒ ★ 버그가 발생할 수 있는 중요한 포인트 ★
⇒ 해결. 테스트용 properties에도 해당 속성값을 추가해주면 된다.
@SpringBootTest 애노테이션의 properties 애트리뷰트
@RunWith(SpringRunner.class)
@SpringBootTest(properties = "person.name=solaring") // <--- 더 높은 우선순위
public class SpringinitApplicationTest {

    @Autowired
    Environment environment;

    @Test
    public void contextLoads() {
        assertThat(environment.getProperty("person.name"))
                .isEqualTo("solaring");
    }
}
테스트에 있는 @TestPropertySource
@RunWith(SpringRunner.class)
@TestPropertySource(properties = "person.name=holaring") // <--- 더 높은 우선순위
@SpringBootTest(properties = "person.name=solaring")
public class SpringinitApplicationTest {

    @Autowired
    Environment environment;

    @Test
    public void contextLoads() {
        assertThat(environment.getProperty("person.name"))
                .isEqualTo("holaring");
    }
}
프로퍼티 파일 명시적으로 지정
test 하위에 있는 properties 파일명이 src 파일명과 같으면 덮어쓰기가 되므로, test.properties파일명으로 변경한 뒤, 테스트 환경에서 프로퍼티 파일을 명시적으로 지정할 수 있다.
@RunWith(SpringRunner.class)
@TestPropertySource(locations = "classpath:/test.properties") // <-- 파일 지정
@SpringBootTest
public class SpringinitApplicationTest {

    @Autowired
    Environment environment;

    @Test
    public void contextLoads() {
        assertThat(environment.getProperty("person.name"))
                .isEqualTo("holari");
    }
}
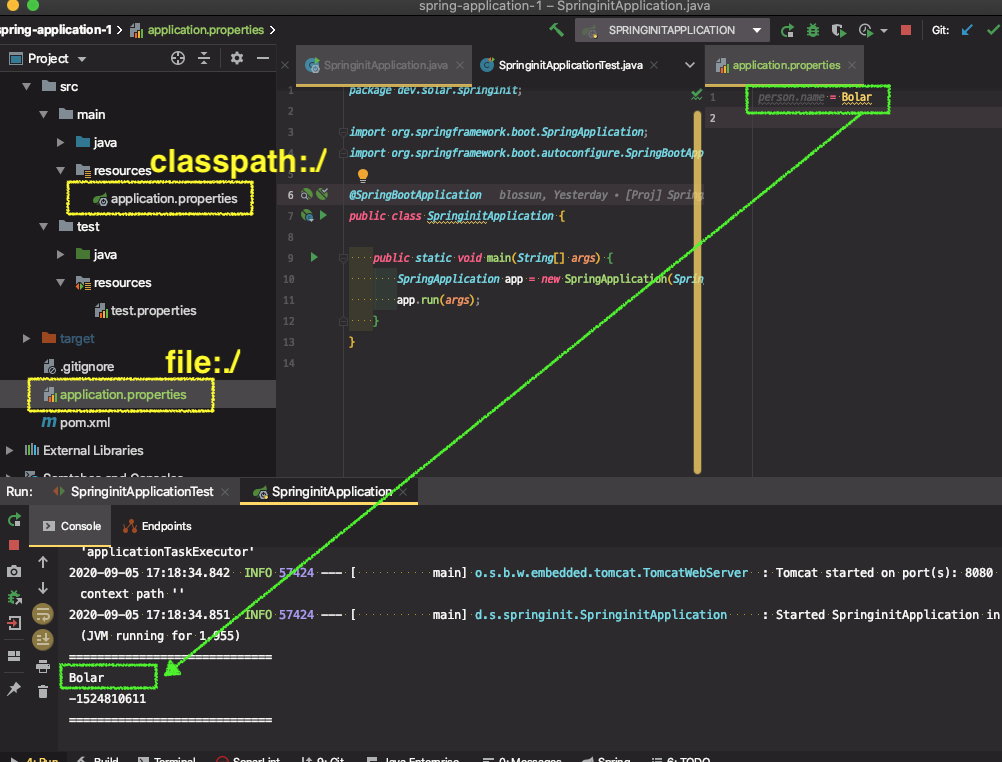
application.properties 우선 순위
- file:./config/
- file:./
./: Project 루트 - JAR 파일이 실행되는 위치)
-
classpath:/config/
- classpath:/
- (높은게 낮은걸 덮어 쓴다.)
다음 두 설정이 되어있는 상태에서 실습
-
2위 -
file:./에 있는 application properties -
4위 -
classpath:/에 있는 application properties

