[활용]_07_테스트
테스트
시작은 일단 spring-boot-starter-test를 추가하는 것 부터
- test 스콥으로 추가.
@SpringBootTest
- @RunWith(SpringRunner.class)랑 같이 써야 함.
- 빈 설정 파일은 설정을 안해주나? 알아서 찾습니다. (@SpringBootApplication)
- webEnvironment
- MOCK: mock servlet environment. 내장 톰캣 구동 안 함.
- RANDOM_PORT, DEFINED_PORT: 내장 톰캣 사용 함.
- NONE : 서블릿환경 제공 안 함.
@MockBean
- ApplicationContext에 들어있는 빈을 Mock으로 만든 객체로 교체 함.
- 모든 @Test 마다 자동으로 리셋.
슬라이스 테스트
- 레이어 별로 잘라서 테스트하고 싶을 때
- @JsonTest
- @WebMvcTes
- @WebFluxTest
- @DataJpaTest
- …
테스트 환경 구성
spring-boot-starter-test를 test 스콥으로 추가
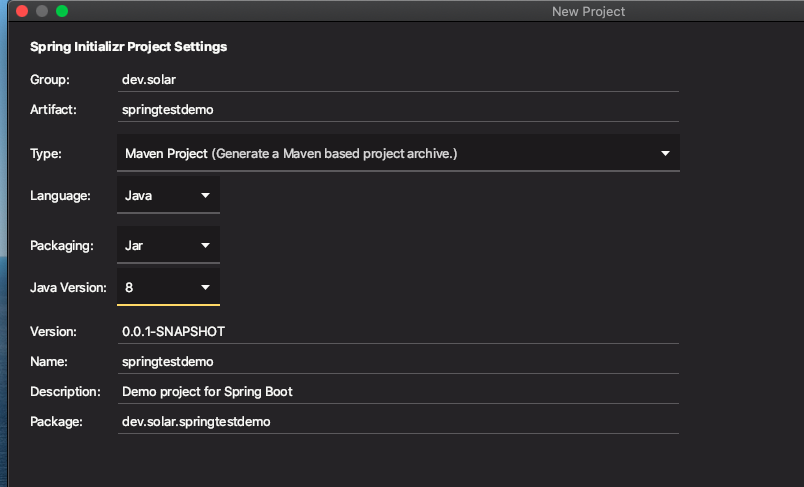
- New Project - [springtestdemo]
- 의존성
Web만 추가
- 의존성

- Test code 작성을 위한 의존성이 추가돼있는지 확인
<dependency>
  <groupId>org.springframework.boot</groupId>
  <artifactId>spring-boot-starter-test</artifactId>
  <scope>test</scope>
</dependency>
※ 참고… @RunWith가 안나와서 확인해보니 다음과 같이 junit-vintage-engine 의존성이 exclution되어있어서 exclusions 코드를 주석처리했음.
<dependency>
  <groupId>org.springframework.boot</groupId>
  <artifactId>spring-boot-starter-test</artifactId>
  <scope>test</scope>
  <!--            <exclusions>-->
  <!--                <exclusion>-->
  <!--                    <groupId>org.junit.vintage</groupId>-->
  <!--                    <artifactId>junit-vintage-engine</artifactId>-->
  <!--                </exclusion>-->
  <!--            </exclusions>-->
</dependency>
※ [실습] 테스트를 위한 기본 프로젝트 구성
- SampleController.java
@RestController
public class SampleController {

    @Autowired
    private SampleService sampleService;

    @GetMapping("/hello")
    public String hello() {
        return "hello " + sampleService.getName();
    }
}
- SampleService.java
@Service
public class SampleService {

    public String getName() {
        return "Solar";
    }
}
- SampleControllerTest.java
import org.junit.runner.RunWith;
import org.springframework.boot.test.context.SpringBootTest;
import org.springframework.test.context.junit4.SpringRunner;

@RunWith(SpringRunner.class)
@SpringBootTest(webEnvironment = SpringBootTest.WebEnvironment.MOCK)
public class SampleControllerTest {

}
@SpringBootTest
-
통합 테스트
- @RunWith(SpringRunner.class)랑 같이 써야 함.
- 빈 설정 파일은 설정을 안해주나? 알아서 찾습니다. (@SpringBootApplication)
- webEnvironment
MOCK: mock servlet environment. 내장 톰캣 구동 안 함.RANDOM_PORT(추천),DEFINED_PORT(지정한 포트 사용): 내장 톰캣 사용 함.NONE: 서블릿 환경 제공 안 함.
※ WebEnvironment - Mock 환경
- mock servlet environment. 내장 톰캣 구동 안 함.
MockMvc를 사용해야 한다.
1. MockMvc 사용
1. MockMvc 생성
기본적으로 SpringBootTest의 WebEnvironment 값이 MOCK으로 되어있다.

(스프링 프레임워크의 테스팅 흐름을 알아야한다.)
서블릿 컨테이너를 테스트용으로 띄우지않고, 서블릿을 mocking한 것이 뜬다. 그래서 DispatcherServlet이 만들어지긴 하는데, 목업에서 DispatcherServlet에 요청을 보낸 것과 비슷하게 실험은 할 수 있다. 그 때 mockup이 된 서블릿에 interaction하기 위해서는 MockMVC라는 클라이언트를 사용해야 한다.
- 스프링부트에서 MockMvc를 만드는 방법 (1) - 가장 쉬운 방법
@AutoConfigureMockMvc 어노테이션을 추가하여 MockMvc를 주입받는다.
import org.springframework.boot.test.autoconfigure.web.servlet.AutoConfigureMockMvc;
import org.springframework.test.web.servlet.MockMvc;

@RunWith(SpringRunner.class)
@SpringBootTest(webEnvironment = SpringBootTest.WebEnvironment.MOCK)
@AutoConfigureMockMvc
public class SampleControllerTest {

    @Autowired
    MockMvc mockMvc;
}
2. 테스트코드 작성
- MockMvc로 hello controller를 테스트
- 어떤 컨트롤러, 어떤 메서드를 썼는지도 테스트할 수 있음
@RunWith(SpringRunner.class)
@SpringBootTest(webEnvironment = SpringBootTest.WebEnvironment.MOCK)
@AutoConfigureMockMvc
public class SampleControllerTest {

    @Autowired
    MockMvc mockMvc;

    @Test
    public void hello() throws Exception {
        mockMvc.perform(get("/hello")) // <-- /hello url에 get 요청에 대한 테스트
                .andExpect(status().isOk()) // <-- response status 값 200 체크
                .andExpect(content().string("hello Solar")) // <-- response body 값 string으로 체크
                .andDo(print()); // <-- 요청 정보 출력
    }
}
3. import static method
-
status,content,print: result 패키지로 가져와야함 -
get 메서드 static import 자동으로 안돼서 직접 쳐줌….
import static org.springframework.test.web.servlet.request.MockMvcRequestBuilders.get;
import static org.springframework.test.web.servlet.result.MockMvcResultHandlers.print; //<-- result 패키지
import static org.springframework.test.web.servlet.result.MockMvcResultMatchers.content;
import static org.springframework.test.web.servlet.result.MockMvcResultMatchers.status;
4. 테스트 결과
print로 찍히는 대부분의 정보를 테스트해볼 수 있다.
      HTTP Method = GET
      Request URI = /hello
       Parameters = {}
          Headers = []
             Body = null
    Session Attrs = {}

Handler:
             Type = dev.solar.springtestdemo.sample.SampleController
           Method = dev.solar.springtestdemo.sample.SampleController#hello()

Async:
    Async started = false
     Async result = null

Resolved Exception:
             Type = null

ModelAndView:
        View name = null
             View = null
            Model = null

FlashMap:
       Attributes = null

MockHttpServletResponse:
           Status = 200
    Error message = null
          Headers = [Content-Type:"text/plain;charset=UTF-8", Content-Length:"11"]
     Content type = text/plain;charset=UTF-8
             Body = hello Solar
    Forwarded URL = null
   Redirected URL = null
          Cookies = []
※ WebEnvironment - RANDOM_PORT 환경
- 내장 톰캣 사용 함
-
실제 서블릿이 랜덤한 포트에 띄워진다.
- MockMvc를 사용하지 않고,
RestTemplate이나테스트용 RestTemplate,테스트용 WebClient를 써야한다.
2. 테스트용 RestTemplate 사용하기
별도의 설정 추가 없이 TestRestTemplate을 주입받을 수 있다.
@Autowired
TestRestTemplate testRestTemplate; //테스트용 TestTemplate
BodyTyperesult = testRestTemplate.getForObject(Stringurl, 받으려는Response Body Type);
import org.springframework.boot.test.web.client.TestRestTemplate;
import org.springframework.test.context.junit4.SpringRunner;

import static org.assertj.core.api.Assertions.assertThat;

@RunWith(SpringRunner.class)
@SpringBootTest(webEnvironment = SpringBootTest.WebEnvironment.RANDOM_PORT)
public class SampleControllerTest {

    @Autowired
    TestRestTemplate testRestTemplate; //테스트용 TestTemplate

    @Test
    public void hello() throws Exception {
        String result = testRestTemplate.getForObject("/hello", String.class);
        assertThat(result).isEqualTo("hello Solar");
    }
}
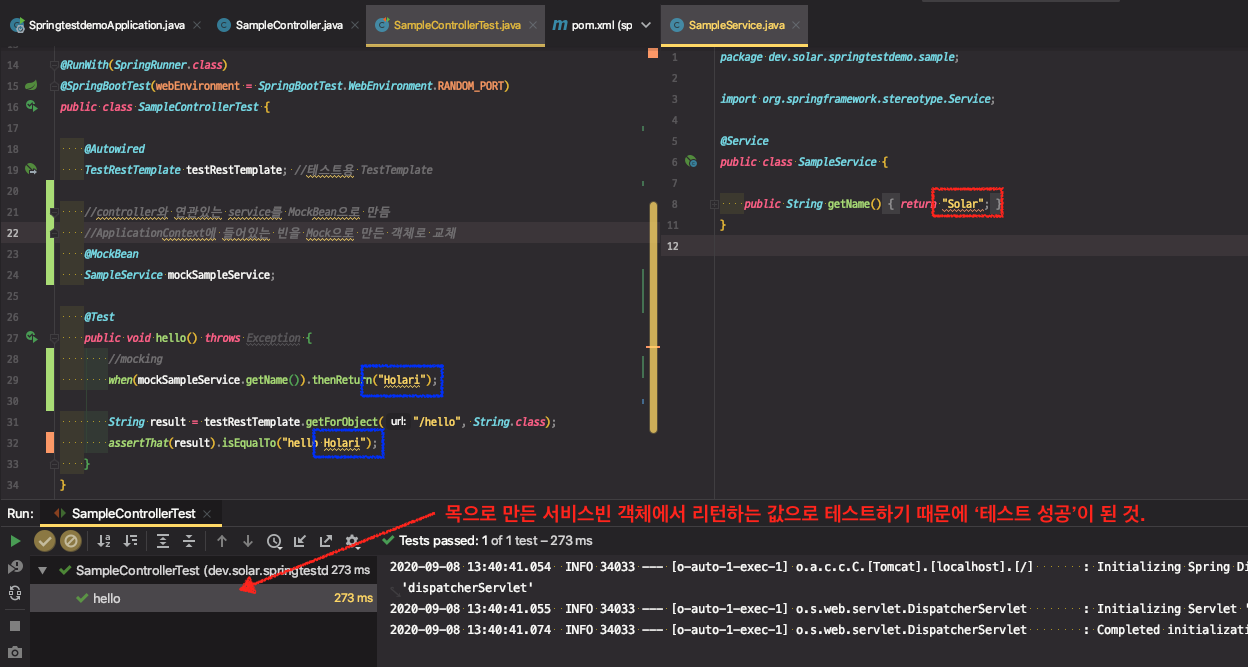
※ 테스트 성공

※ 테스트 실패

⇒ 이렇게 테스트하면
Service단까지 들어간다.Controller만 테스트하고 싶다면 ??
MockBean을 만들어서 테스트
@MockBean
- ApplicationContext에 들어있는 빈을 Mock으로 만든 객체로 교체 함.
- 모든 @Test 마다 자동으로 리셋.
- Service 단까지 들어가지 않고 controller만 테스트할 수 있음
@MockBean 어노테이션으로 테스트하려는 컨트롤러와 연관관계있는 서비스를 mockSampleService로 만들면, ApplicationContext에 들어있는 빈을 Mock으로 만든 객체로 교체 한다.
실질적으로 컨트롤러는 (원본 Service가 아니라) Mock SampleService를 쓰게 된다.
※ [실습] MockBean 사용하기
import org.springframework.boot.test.mock.mockito.MockBean;
import static org.mockito.Mockito.when;

@RunWith(SpringRunner.class)
@SpringBootTest(webEnvironment = SpringBootTest.WebEnvironment.RANDOM_PORT)
public class SampleControllerTest {

    @Autowired
    TestRestTemplate testRestTemplate; //테스트용 TestTemplate

    //controller와 연관있는 service를 MockBean으로 만듬
    //ApplicationContext에 들어있는 빈을 Mock으로 만든 객체로 교체
    @MockBean
    SampleService mockSampleService;

    @Test
    public void hello() throws Exception {
        //mocking
        when(mockSampleService.getName()).thenReturn("Holari"); // 요청이왔을 때 return할 값 설정

        String result = testRestTemplate.getForObject("/hello", String.class);
        assertThat(result).isEqualTo("hello Holari");
    }
}
아래의 SampleService 대신에 Mock으로 만든 mockSampleService로 대체되는 것이다.
@Service
public class SampleService {

  public String getName() {
    return "Solar";
  }
}

3. WebTestClient 사용
- JAVA 5 (Spring webflux1)에 추가
RestClient 중 하나 이다. 기존에 사용하던 RestClient는 synchronous(동기)이다. 요청 하나 보내고 해당 요청이 끝날때까지 기다린 후에 종료되면 다음 요청을 보낼 수 있었다. WebClient는 asynchronous(비동기)이다. 요청을 보내고 기다리는 것이 아니라 응답이 오면 그 때 우리한테 콜백(이벤트)이 온다. 그러면 그 때 콜백을 실행할 수 있다.
그런식으로 비동기적으로 동작하기때문에 우리가 테스트코드에서도 WebTestclient를 이용해서 WebClient와 비슷한 API를 사용할 수 있다.
WebClient를 사용하려 Spring Webflux가 Dependency에 들어와 있어야 한다.
<dependency>
  <groupId>org.springframework.boot</groupId>
  <artifactId>spring-boot-starter-webflux</artifactId>
</dependency>
※ [실습] WebTestClient 사용하기
import org.springframework.test.web.reactive.server.WebTestClient;

@RunWith(SpringRunner.class)
@SpringBootTest(webEnvironment = SpringBootTest.WebEnvironment.RANDOM_PORT)
public class SampleControllerTest {

    @Autowired
    WebTestClient webTestClient; //WebClient와 비슷하게 동작하는 비동기 처리방식의 API

    //controller와 연관있는 service를 MockBean으로 만듬
    //ApplicationContext에 들어있는 빈을 Mock으로 만든 객체로 교체
    @MockBean
    SampleService mockSampleService;

    @Test
    public void hello() throws Exception {
        //mocking
        when(mockSampleService.getName()).thenReturn("Solar");

        webTestClient.get().uri("/hello")
                .exchange().expectStatus().isOk()
                .expectBody(String.class).isEqualTo("hello Solar");
    }
}
※ Test Code 작성하기 불편한 API 순위
RestTemplate > MockMvc > … > WebTestClient(편함)
- 동기 처리 때문이 아니더라도(reactive WebMvc) WebClient가 제공하는 API가 편리해서 주로 사용하기 좋음
REF
슬라이스 테스트
앞서 진행한 테스트는 어마어마한 통합 테스트이다. @SpringBootTest어노테이션이 스프링 어플리케이션의 main을 찾아간다. @SpringBootApplication 어노테이션을 찾아가서 여기서부터 하는 모든 빈 스캐닝을 하게 된다.
모든 빈을 테스트용 Application Context를 만들면서 등록해주고, MockBean은 따로 교체해준다.
교체된 MockBean은 테스트마다 reset되므로 따로 관리하지 않고, 테스트 처음에 바로 mocking하고 시작해도 지장이 없다.
수많은 빈들이 등록되는 것이 싫고, 테스트하고 싶은 빈만 등록하고 싶다면 ?
사용할 수 있는 것이
슬라이스 테스트용 빈이다.
-
레이어별로 잘라서 적용된다.
- @JsonTest
- @WebMvcTes
- @WebFluxTest
- @DataJpaTest : Repository만 등록 된다.
@JsonTest
우리가 가지고 있는 모델이 Json 형태로 나갈 때 어떤 형태로 출력되는지 테스트할 수 있다.
JacksonTester를 주입받아서 사용
@JsonTest
class MyJsonTests {

    @Autowired
    private JacksonTester<VehicleDetails> json;

    @Test
    void testSerialize() throws Exception {
        VehicleDetails details = new VehicleDetails("Honda", "Civic");
        // Assert against a `.json` file in the same package as the test
        assertThat(this.json.write(details)).isEqualToJson("expected.json"); //비교하려는 내용을 담은 json 파일
        // Or use JSON path based assertions
        assertThat(this.json.write(details)).hasJsonPathStringValue("@.make");
        assertThat(this.json.write(details)).extractingJsonPathStringValue("@.make")
                .isEqualTo("Honda"); //key가 값을 가지고 있는지
    }
}
⇒ 이렇게하면 필요한 빈만 만들고 테스트하기 때문에 빠르긴 하겠지만, ApplicationContext를 만들면 다른 데서 공유해서 쓰기 때문에 큰 차이 없을 듯? 그래도 테스트 최적화에 좋음
@WebMvcTest
컨트롤러 하나만 테스트하기 좋음
@WebMvcTest(SampleController.class)
이렇게하면 web과 관련된 빈들만 등록된다. (일반적인 컴포넌트들은 빈으로 등록되지 않는다.)
@Controller, @ControllerAdvice, @JsonComponent, Converter, GenericConverter, Filter, HandlerInterceptor, WebMvcConfigurer, and HandlerMethodArgumentResolver.
- Service나 Repository는 등록 안 됨
웹 계층 하위의 의존성들은 전부 끊기게 된다. 그렇기 때문에 사용하는 의존성이 있다면 MockBean으로 만들어서 채워줘야한다.
따라서, @WebMvcTest는 MockMvc로 테스트해야한다.
※ content() : 자동 import 안 됨.
import static org.springframework.test.web.servlet.result.MockMvcResultMatchers.content
import static org.mockito.Mockito.when;
import static org.springframework.test.web.servlet.request.MockMvcRequestBuilders.get;
import static org.springframework.test.web.servlet.result.MockMvcResultMatchers.content;

@RunWith(SpringRunner.class)
@WebMvcTest(SampleController.class) //이 컨트롤러 하나만 테스트
public class SampleControllerTest {

    @Autowired
    MockMvc mockMvc;
    //controller와 연관있는 service를 MockBean으로 만듬
    //ApplicationContext에 들어있는 빈을 Mock으로 만든 객체로 교체
    @MockBean
    SampleService mockSampleService;

    @Test
    public void hello() throws Exception {
        //mocking
        when(mockSampleService.getName()).thenReturn("Solar");

        mockMvc.perform(get("/hello"))
                .andExpect(content().string("hello Solar"));
    }
}
테스트 유틸
스프링부트에서 제공하는 테스트 유틸리티
OutputCapture(deprecated), OutputCaptureRule 로 사용- TestPropertyValues
- TestRestTemplate
- ConfigFileApplicationContextInitializer
OutputCaptureRule
-
OutputCapture는 2.2.0 부터 Deprecated 됨 -
Spring Docs - outputcapture test utility, Spring Docs 2.2.2- OutputCaptureRule
- Junit에 있는 Rule을 확장해서 만든 것
- OutputcaptureRule은
public으로 만들어줘야한다. (Rule의 제약사항)
@Rule은 Junit 꺼라서 Autowired 받는게 아니라 객체를 만들어줘야함.
- 로그를 비롯해서 콘솔에 찍히는 모든 것을 다 캡쳐한다.
로그를 출력하는 방식으로 테스트해보기 좋다. 중요한 부분에 로깅하고 로그가 출력되었는지 아닌지를 가지고 테스트하면 좋다.
(강의에서 보여준 코드랑 다름. Spring Docs 보고 코딩)
- 테스트하려는 controller에 로그 출력 추가
@RestController
public class SampleController {
	//logger 추가
    private static final Logger log = LoggerFactory.getLogger(SampleController.class);

    @Autowired
    private SampleService sampleService;

    @GetMapping("/hello")
    public String hello() {
      // 콘솔에 log와 println 출력
        log.info("nunnu");
        System.out.println("skip"); //이렇게 쓰는 것은 비추
        return "hello " + sampleService.getName();
    }
}
- 테스트
package dev.solar.springtestdemo.sample;

import org.junit.Rule;
import org.springframework.boot.test.system.OutputCaptureRule;
import static org.assertj.core.api.Assertions.assertThat;

@RunWith(SpringRunner.class)
@WebMvcTest(SampleController.class) //이 컨트롤러 하나만 테스트
public class SampleControllerTest {

  //OutputCaptureRule 객체 **public**하게 생성
    @Rule
    public OutputCaptureRule output = new OutputCaptureRule();

    @Autowired
    MockMvc mockMvc;

    @MockBean
    SampleService mockSampleService;

    @Test
    public void hello() throws Exception {

        when(mockSampleService.getName()).thenReturn("Solar");

        mockMvc.perform(get("/hello"))
                .andExpect(content().string("hello Solar"));

      //output 결과 확인
        assertThat(output)
                .contains("nunnu")
                .contains("skip");
    }
}

-
web-flux는 Spring Framwork5에서 새롭게 추가된 모듈로 client, server에서 reactive 스타일의 어플리케이션 개발을 도와준다. ↩
